A User can add new Customers from the Manage Customers tab. All customers can be added from this menu, with the exception of fleet customers. To add a fleet customer, please see Fleet Accounts.
To add a new customer
- On the Customers menu, click Manage Customers.
The Manage Customers tab appears.

- Under Tools, click the Add Customer button.

The Customer Information, Vehicle Information, and Customer Group(s) tabs appear with the essential tools needed to setup the Customer.
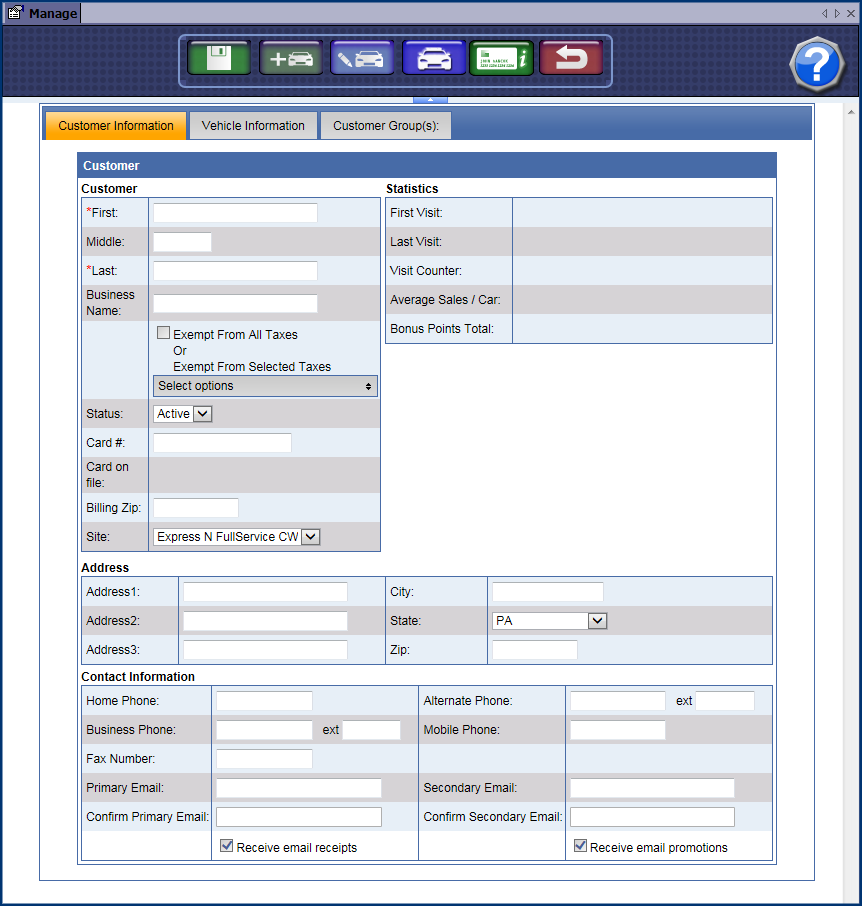
- Required Entries* under Customer Information:
- *First. Customer’s first name.
- *Last. Customer’s last name.
- In the Business Name box, type business name if necessary.
- In the Tax Exempt box, select a tax exempt rule, if applicable. If left unmarked, the customer will be taxed according to the Tax of the selected Sales Item PLU.
- In the Card # box, type or edit a customer card number, for example, club cards. (if using magnetic swipe card instead of RFID tags)
IMPORTANT: Do NOT enter credit card number here!
- In the Billing Zip box, type the credit card's billing zip code.
- In the Site box, select the site where customer will be autobilled. This will be the site where the customer will visit the most frequently.
- Statistics are tracked for customers. For new customers, tatistics may be blank as this data has not yet been generated.
- In the Primary Email and Secondary Email boxes, type in valid email addresses.
- In the Confirm Primary Email and Confirm Secondary Email boxes, type in the valid email address(es) again that you typed in the Primary or Secondary Email boxes.
- Select the Receive email receipts check box.
After a valid address has been entered in the Primary or Secondary Email box, the customer will immediately begin to receive their receipts via Email.
- Select Receive email promotions check box.
After a valid address has been entered in the Primary or Secondary Email box, the customer will immediately begin to receive any promotions via Email.
See Promotions.
- In remaining Address and Contact Information fields, type any additional information available.
- Click the Save button.
The message "Customer saved successfully" appears.
- If applicable, you can add a Customer to a Group, click the Customer Group(s) tab.
The Customer Groups that have been created are listed.
See Add a Group if you need to create a new Customer Group.
Tip: Create a Group for your site, and add all new customers to this group when adding new customer to WashConnect®. This grouop can be used to email all customers for this site in the future.
- Select the Group check box.
- Click the Save button.
- Next, you can Add a Vehicle.
See Add Vehicle for Club Customer.