 A package PLU is a group of Sales Items with different PLUs sold together.
To Add a Package to a Profit Center, follow these steps:
- Log on to WashConnect at Corporate, if you intend to see the Package at all wash sites.
- See Add Sales Item to set up all of the Sales Items necessary: individual services and discounts that will be used in the package.
- Select Configuration > Goods & Services > Packages.
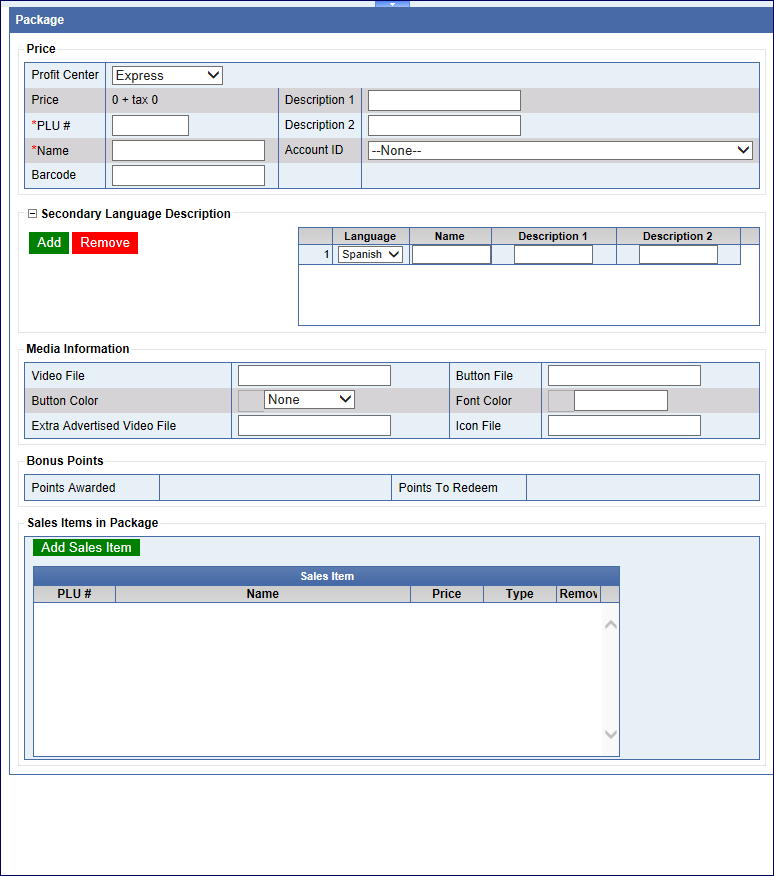

- Click the Add Package button.

- In the Profit Center box, select a profit center from the list. This package will appear in this Profit Center tab on the Touch POS.
- In the Price box, you cannot edit. WashConnect automatically calculates all the services and taxes based on the cumulative Sales Items prices.
- In the PLU box, type a PLU number for the new package.
NOTE: If a warning icon appears, hover over the warning symbol. If the warning message "Another PLU exists" appears, then select another PLU number.
- In the Name box, type a name for the new package.
- In the Barcode box, type a barcode number if you are adding a discount or fund raiser to your package.
- In the Account ID box, select an account number from the list if you wish to link Accounting Profiles to your Packages.
- In the Description 1 and 2 box, type a description for the default text to appear on the package button. If you have custom graphics, this description will not appear, unless the custom graphic file is unavailable.
- In the Secondary Language Description box, click the Add button.
- In the Language box, select a secondary back up language for your wash.
- In the Name box, type a secondary name for the package.
- In the Description 1 and 2 box, type a secondary language description for the package.
Media Information section:
- In the Video File box, type in a video to play on the Auto Sentry from an Info file.
- In the BMP File box, type in the name of the custom graphic button file to appear on the Auto Sentry.
- In the BMP Color box, select a color to customize the buttons on the POS.
- In the Fore Color box, select a color to customize the buttons on the POS.
- In the Extra Advertised Video File box, select a video file.
- In the Icon File box, select an icon file name service being used in the hand finished service queue.
Bonus Points Section:
Reward customers with redeemable bonus points that may good for discounts on future car washes. These need to be set up prior to adding to your packages. See Promotions for more Bonus Points information.
- Fill in the other optional fields, if necessary.
Sales Item in Package section:
- In the Sales Items in Package section, click to select the Add Sales Item button.

The Add Sales Item dialog box appears.
- In the Profit Center box, select a profit center from the alphabetized list.
The profit center sales items appear.
- Click to select the sales items from the list to add to the Package.
- Click OK.
To add another sales item from a different profit center
- In the Sales Items in Package section, click to select the Add Sales Item button.
The Add Sales Item dialog box appears.
- In the Profit Center box, select a profit center from the alphabetized list.
The profit center sales items appear.
- Click to select the sales item(s) from the list to add to the Package.
- Click OK.
- In Price, you can see the pricing reflects all the sales items and taxes for those sales items in the Package.
NOTE: You cannot manually change the actual price of the Package. The price changes need to be reflected in the Sales Item PLUs. Perhaps to lower the price, consider adding a discount PLU.
- Click the Save button.