You can set up an email blast directly from WashConnect. Prior to setting up an email, all you need to do is save your customer's email addresses in WashConnect from Manage Customers. You can send a thank you to all customers or create a promotion and market the promotion based on a Customer Group. Follow these steps to add and schedule an email.
NOTE: Contact Technical Support to enable the Marketing Email menu for the initial use.
- From the WashConnect logon, select Corporate.
- From the Configuration menu, select Marketing Email.
-
In the View box, select the one of the following:
- As List to view the saved Marketing and Notification Emails in a list.
- As Calendar (Marketing Emails) to view the Marketing Emails on a Calendar.
- Click the Add button.
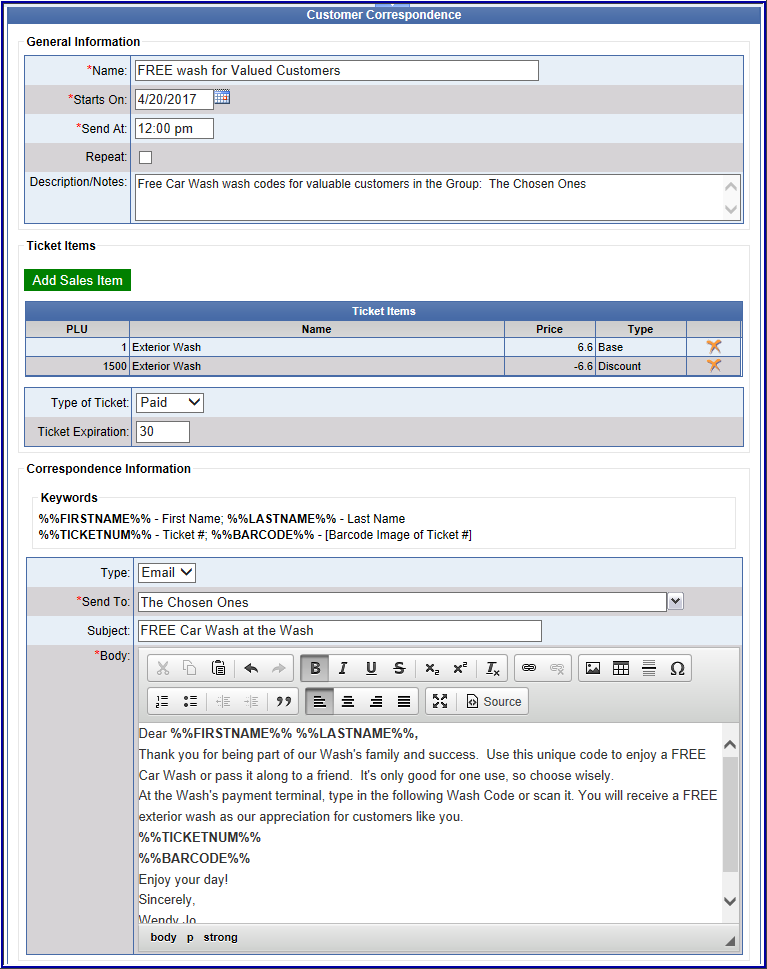
General Information section:
- In the Type box, type the name of the Marketing campaign.
- In the Name box, type the name of the Marketing Email that you want to send.
- In the Starts On box, select a date to send the email.
- In the Send At box, select a time to send the email.
- In the Repeat box, select to repeat this email.
A Repeat dialog appears
- In the Frequency box, select Daily, Weekly, Monthly, Yearly.
- In the Repeat every box, select an amount of times to repeat this email. Monthly (1 = monthly), Yearly (2 = once every two years)
- In the Starts On box, displays the first date available to send your email.
NOTE: The Starts On date is selected when adding a new Marketing Email prior to selecting the Repeat box.
- In the End box, one of the following:
- Never - the email will repeat indefinitely.
- On - select a date to end the repeated email.
- Review the Summary to make certain that setup is correct.
- Click Done.
Ticket Items section:
- Click the Add Sales Item button for Sales Item PLU for this promotional email. If you are not creating a ticket with a promotion, skip to the second part of step 16.
- In the Profit Center list, select a profit center.
NOTE: Only can select one base wash service.
- Select all the necessary sales item boxes.
- Click the OK button.
- In Type of Ticket box, select Unpaid or Paid.
- In Ticket Expiration, type in an amount of days for this email to be valid.
Correspondence Information section:
- In the Keywords section, the merge fields are displayed that you can copy into the body of the email.
|
Merge Field Name
|
Copy and Paste this Merge Field
|
|
Customer’s First Name
|
%%FIRSTNAME%%
|
|
Customer’s Last Name
|
%%LASTNAME%%
|
|
Plate
|
%%PLATE%%
|
|
RFID #
|
%%RFID#%%
|
|
Club Name
|
%%PROGRAMNAME%%
|
|
Club Price
|
%%PROGRAMPRICE%%
|
|
Joined Date
|
%%JOINEDDATE%%
|
|
Expiration Date
|
%%CLUBEXPIRATIONDATE%%
|
|
Ticket Number
|
%%TICKETNUM%%
|
|
Barcode Image of Ticket Number
|
%%BARCODE%%
|
- In the Send To box, select All (all customers) -or- the individual check boxes for fleets, clubs, customer groups, and more.
- In the Subject box, type a subject line. (Max. 78 Characters)
- In the Body box, type the body of your message. Use the editing toolbar to format the body of the email, copy and paste the Merge Fields in the body to personalize and add the promotional information.
- Click the Save button.
This email has been set up to automatically generate on the selected date and time, and all recipients will receive either a correspondence letter or a promotional email with a ticket number and bar code image.
- Click the Cancel button.
The Communication Listing displays. In the Active column, a check mark shows the communication listing is active, and an X shows a Communication listing that has already passed.
Email alert for clubs expiring will customize the body of the email to include the associated vehicle and
more selected membership information like RFID, Plate, Club Name, Club Price, Joined Date, and
Club Expiration Date.