At the end of the shift, you will need to Close the POS Register Shift.
IMPORTANT: It's important that shifts are opened and closed accurately to ensure cash accountability.
NOTES:
- These instructions assume you are using the Safe.
- If midnight has passed and the prior shift was not closed, in order to begin a new shift for the current day, the system will require you to close the previous shift.
To Close a POS register Shift, follow these steps:
- Open WashConnect® at the local site.
- On the Touch POS menu, select the Close Shift button.

- If you receive the message "Are you certain you want to close the shift?", click Yes.
The Open Shift tab appears with the the Deposit to Safe section available.
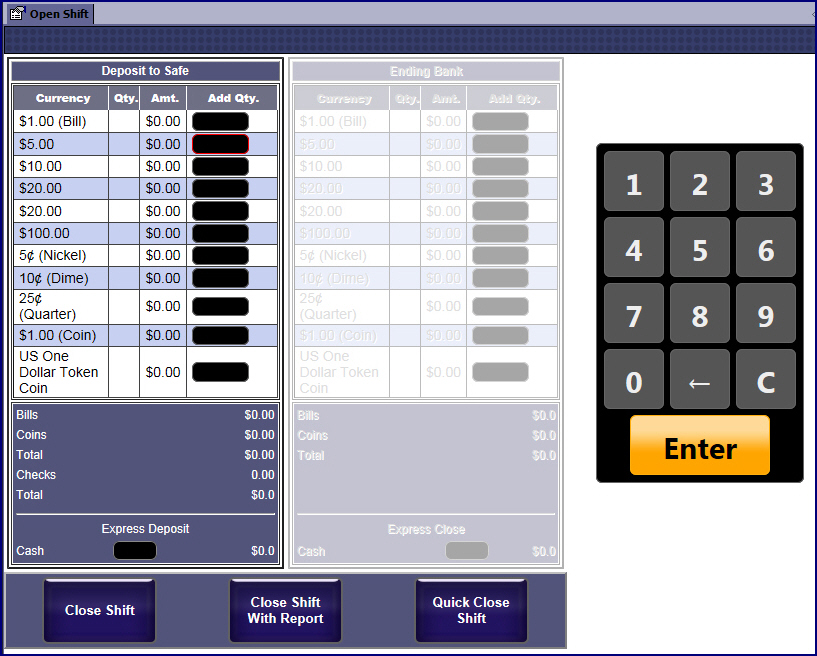
- From the Deposit to Safe section, you can use your on-screen numeric keypad or your keyboard to enter the quantity of bills, coins, or token in the Add Qty. boxes that you physically remove from the POS cash drawer and deposit in the Safe at the close your shift.
NOTE: When using a Safe, all money is supposed to be removed from the drawer at the end of the shift and placed in the safe so it always closes with zero.
- You can choose one of the following options:
- Click the Close Shift button.
The shift is closed without printing a report. The Add journal entry has been made. In most cases, a different manager would verify the contents of the deposit.
–or–
- Click the Close Shift with Report button.
The shift is closed and prints a journal receipt on the POS receipt printer. The Add journal entry has been made.
–or–
- Click the Quick Close Shift button.
This button is strictly meant for sites that want to change cashier shifts quickly and have the cashier go into a back room to count their drawer.
–or if available–
- Type the amount in the Express Deposit (lump sum) box but only use Express Deposit if you do not type amounts in the denomination boxes.
NOTE: Express Deposit is only available if the Safe is NOT configured for the Touch POS device.
The total amount in the Safe appears on the Total line.
- Physically remove the amount of money entered in step #4 from the POS cash drawer and physically add the money to the safe.
NOTE: The Quick Close Shift option is only available for use if you do not enter any quantities in the denomination section.
- When a POS Shift is closed and End of Day Processing is enabled, the End of Day Processing dialog box appears:
NOTE: See System Setup Devices to configure End of Day Processing.
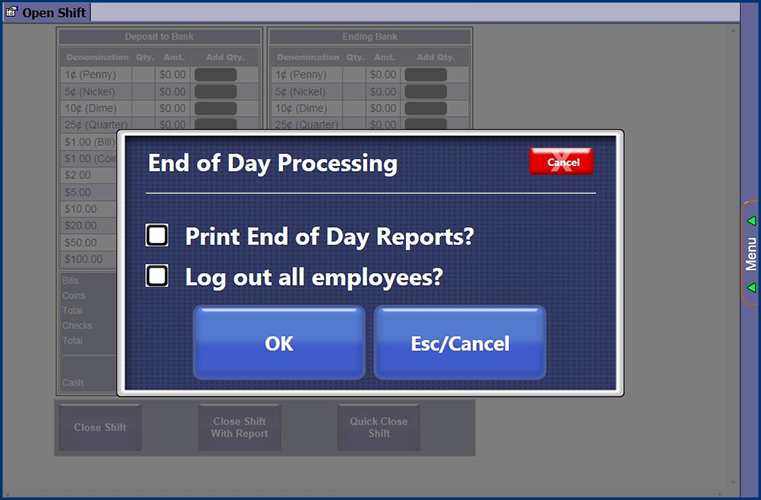
- Click to select Print End of Day Reports? check box, if necessary.
This feature allows selected reports to be automatically generated upon closing a POS shift.
- Click to select Log out all employees? check box, if necessary.
This feature allows for all clocked in employees to be automatically clocked out.
- Click OK.
Common Practices: Many customers will choose to keep the same amount of change in the drawer every day. They will start the day with a certain amount (ex: $150) and then count the drawer down to the same amount at the end of the shift for their ending bank. Anything over that certain amount will be deposited. This practice makes bookkeeping much easier.