A User can add a new Customer from the Manage Customers tab. All customers can be added from this menu, with the exception of adding a fleet customer. To add a fleet customer, please see Fleet Accounts.
To add a New Customer:
- On the Customers menu, click Manage Customers.
The Manage Customers tab appears.
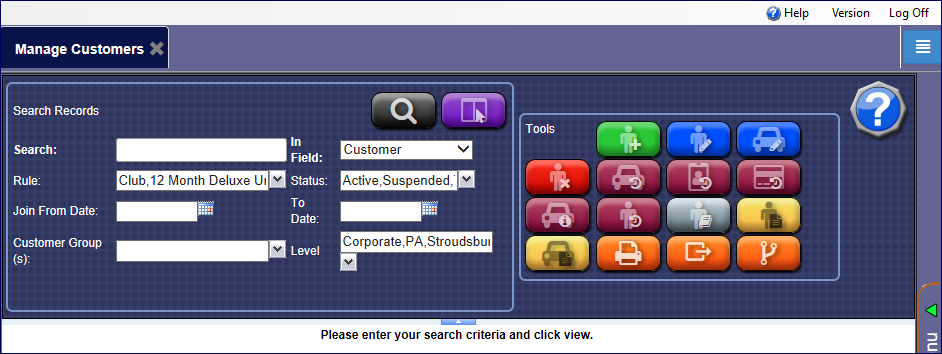
- Click the Add Customer button.

The Customer Information, Vehicle Information, and Customer Group(s) tabs appear with the essential tools needed to setup the Customer.
- Click the Customer Information tab, if necessary.
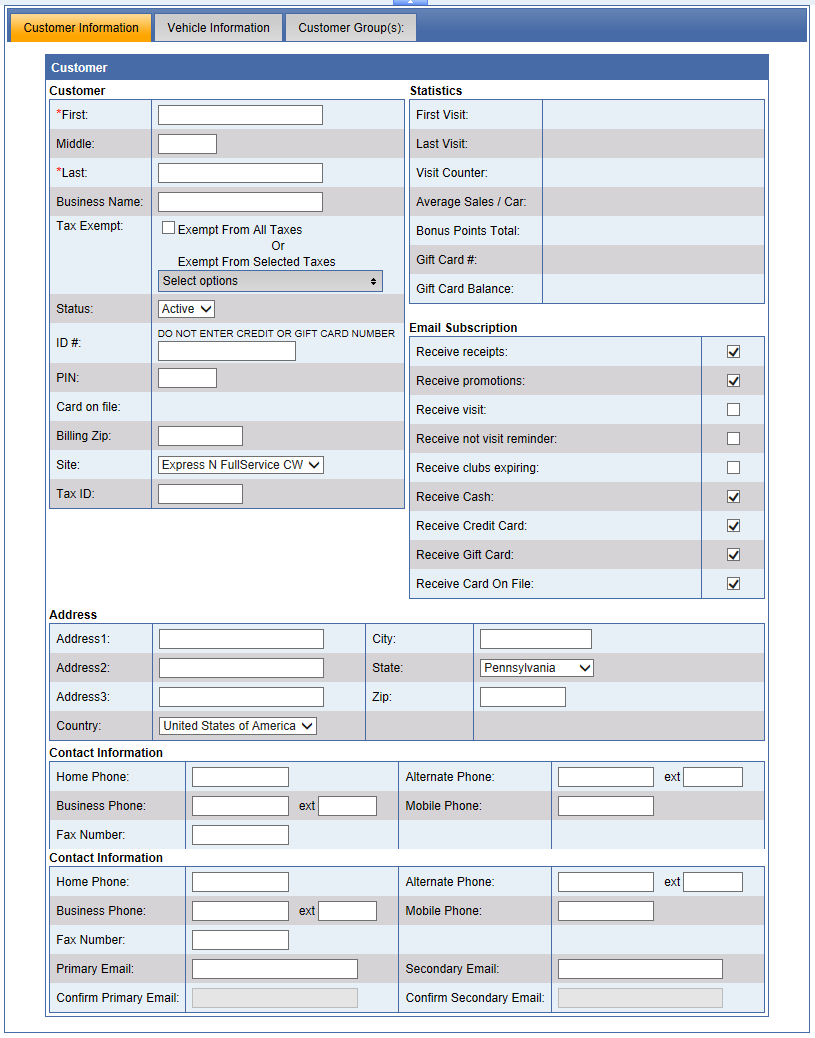
-
There are only two Required Entries* under Customer Information:
- *First. Customer’s first name.
- *Last. Customer’s last name.
- In the Business Name box, type business name.
- In the Tax Exempt box, select a tax exempt rule, if applicable. If left unmarked, the customer will be taxed according to the default Tax of the selected Sales Item PLU.
- In Status box, view the status of the customer.
- In the ID # box, type or edit a customer card number, for example, club card numbers. (if using magnetic swipe card instead of RFID tags)
IMPORTANT: Do NOT enter credit card numbers or gift card numbers here!
- In the PIN box, type a 4-digit PIN for the customer's magnetic swipe card.
- In the Card on file: you can view the credit card type, the last four-digits if available, and the expiration date.
- In the Billing Zip box, type the credit card's billing zip code.
- In the Site box, select the site where customer will be autobilled. This will be the site where the customer will visit most frequently.
- In the Tax ID box, type the tax ID number.
- In the Address section, type any additional information available.
- In the Contact Information section, type any additional information available.
- In the Primary Email and Confirm Primary Email boxes, type in the valid email addresses.
- In the Secondary Email and Confirm Secondary Email boxes, type in the valid email address again that you typed in the respective Primary or Secondary Email boxes.
- In the Statistics section, view wash statistics for the customer. For new customers, statistics may be blank if no data has been generated yet.
Email Subscription Section
In order to immediately begin receiving receipts or email subscriptions, a valid customer Primary or Secondary Email must be saved in Customers Manage. Marketing Email is where the email subscriptions are configured.
When adding a new customer, all email subscription check boxes appear selected by default. Contact ICS Technical Support to clear all the email subscription check boxes when adding a new customer, if your wash prefers.
NOTE: At any time, car wash customers can select to opt out at the bottom of any subscription email.
- Click to select the Email Subscriptions boxes, and then click the Save button.
See
Email Subscription.
The message "Customer saved successfully" appears.
- Next, you can Add a Vehicle.
See Add Vehicle for Club Customer.
- If applicable, you can add a Customer to a Group, click the Customer Group(s) tab.
The Customer Groups that have been created are listed.
See Add a Group if you need to create a new Customer Group.
Tip: Create a Group for your site, and add all new customers to this group when adding new customer to WashConnect®. This group can be used to email all customers for this site in the future.
- Select the Group check box for each group that applies to the customer.
- Click the Save button.