

Before establishing a Fleet Account, determine the preferred billing method: prepaid or monthly invoicing. Only one option can be selected per account. If a change is needed later, the existing Fleet Account must be deleted and a new one created to reflect the desired billing type.
To add a Fleet Account, follow these steps:
- Open WashConnect, in Region(s) select Corporate, region, or the local site, and then click the Log In button.
NOTE: When logged in at the Corporate location, the entire Corporate structure will be available. When logged in at a site level, only that site will be available for selection.
- Select Fleet > Accounts.
- Click the Add Account button.

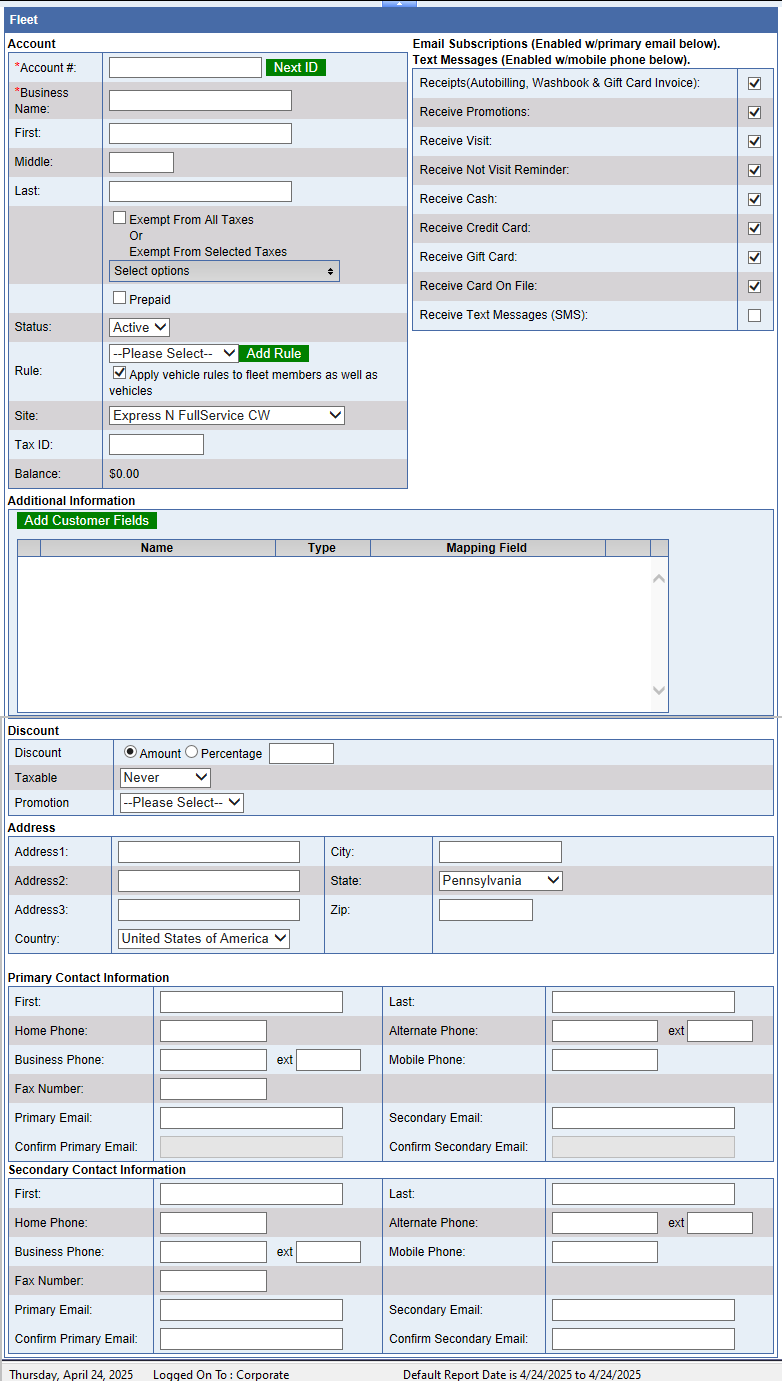
- Required: In the Account # box, enter your account number.
–OR–
Click the Account # Next ID  button, the WashConnect system automatically generates an Account number.
- Required: In the Business Name box, enter a name for the fleet account.
-
If the Fleet Account is tax exempt, select one of the following boxes:
Click to select the Exempt From All Taxes box. (Keep a copy of the business's tax exempt document on file.)
-or-
In the Exempt from Selected Taxes box, click to select options.
-
In the Prepaid box, select to make the account a prepaid account.
IMPORTANT: Prepaid Fleet Account customers cannot be invoiced! Security role privilege set to Prepaid when creating a new Fleet Account. Prepaid Fleets cannot be changed later to invoiced Fleets.
- In the Status box, select one of the following: Active, Suspended, or Terminated.
- In the Rule box, select a rule name that applies to this Fleet Account.
-or-
Click the Add Rule button to create a new rule for the Fleet Account. 
See Add Rules for more information on setting up Fleet Account rules.
- Click to select the Apply vehicle rules to fleet members as well as vehicles box, if necessary.
- In the Site box, select a site.
- In the Billing Zip box, enter the billing zip code for the Fleet Account.
- In the Tax ID box, enter the Tax ID for the Fleet Account.
- In the Balance box, you can view the Prepaid Balance available, or the invoice amount due.
- See the Email Subscription for more information.
NOTE: Additional Information Fields can be set up for car wash customers to answer when redeeming a fleet wash at an ICS payment terminal.
- Optional: from Additional Information, click the Add Customer Fields button.

The Additional Information dialog box appears.
NOTE: Upon Fleet wash redemption, the Touch POS will request these additional fleet information fields.
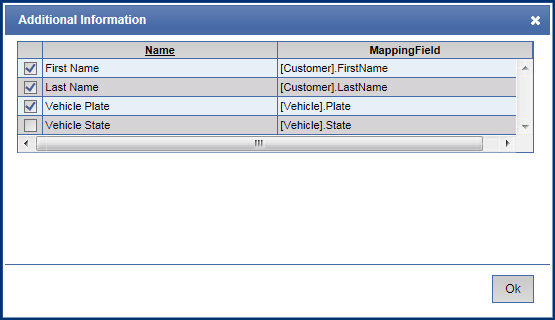
- Click to select the additional field boxes for the fleet, and then click OK.
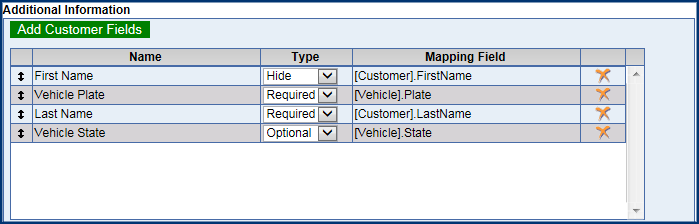
- In the Type box, for each additional info field, select a type from the list: Hide, Required, or Optional.
- To delete additional customer fields, click the Delete button.

- In the Discount box, type a number (dollar amount or percentage) to apply for the Fleet Discount at the Touch POS.
- In the Promotion box, select a promotion for the fleet from the list. See Discount Price List Promotion.
- In the Primary Email and Secondary Email boxes, type in valid email addresses. In the Confirm Primary Email and Confirm Secondary Email boxes, type in the valid email addresses again that you typed in the Primary or Secondary Email boxes.
- In the remaining fields, A Fleet Account manages and tracks the washes for the Fleet of Vehicles.any additional information available.
- Click the Save button.
If you receive the message, "Fleet account saved successfully", then click OK to continue.
Fleet customers and vehicles can now be added to the Fleet Account.